
assignment : 1
Lesar cutter :
My design : to make a Lamp stand
This my design :

This is my comb disign


Make a plastic bottel
First take a midile lene now take water bottel out line ,i will use a line comend & spean cammond.

Another step is i can use a revolved base cammond
first select a center line of the sketch now look like this bottel.

Now i can convoert the bottel revolved base to bottel out line.

it's time to colour to the botttel that look like this

Finally bottel look like this

MAKE A SCHOOL BENCH :


HOW TO DESIGN A SCHOOL BENCH :
First i can make a bench one side of part now complect my sketch
extruded the one side of part that was look like this


Now i can use a center rectangle cammond & extruded it

Now select a center plane & use a mirror cammond

This is a mirror image


First i will be use a inks-cape software because i can draw a 2d design in ganapathi god out line sketch .
And gives a some measurements like a drawing hite also width .
i can use a mm scale .because i want's a small mold.
like a hite-70mm and ,width-60mm .
Now i can select a parth commend and select a tresh bitmap.
now save the svg formate.
And again open the svg file a 123d design software .
now extrude the sketch how match you want a hite of the mold .
And again save this file stl formate .
Now open the computer and using ubuntu software.
First open the netfab software and edit tthe sketch again repair this sketch.
New open start the modela machine and select the x-axes & y axes because how can you start your sketch left or right. Now set the modela gravity .
Now give the sketch for stl formet .
 Finally that look like this

 Looking a students How it's work


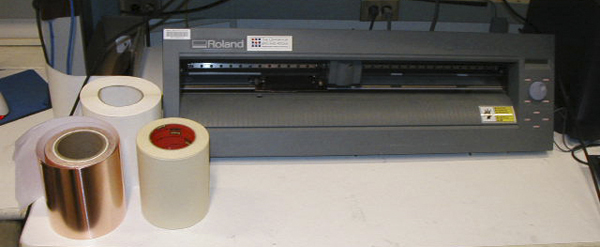
How to use a vinyl cutter
What is vinyl cutter ?
A vinyl cutter is a type of computer-controlled machine. Small vinyl cutters look like computer printers. The computer controls the movement of a sharp blade. This blade is used to cut out shapes and letters from sheets of thin self-adhesive plastic (vinyl).
The vinyl cutter uses a small knife to precisely cut the outline of a picture into a sheet or piece of vinyl. The knife moves side to side and turns, while the vinyl is moved beneath the knife. What results from the cut process is an image cut into the material. The material is then 'weeded' where the excess parts of the picture are removed. It is possible to remove the positive parts, which would give a negative sticker, or you could weed the negative parts, giving a positive sticker. Removing the letters would be like removing the positive, giving a negative image of the word, etc.
Now i can show how to use vinyl cutter ?
Then put your piece under the rollers and use the lever to put the rollers down, holding the piece in place.
Now there will probably be a message about sheet unloaded. Select "piece". The machine will measure the width and length of your piece.

Lesar cutter :
My design : to make a Lamp stand
This my design :

This is my comb disign


Make a plastic bottel
First take a midile lene now take water bottel out line ,i will use a line comend & spean cammond.

Another step is i can use a revolved base cammond
first select a center line of the sketch now look like this bottel.

Now i can convoert the bottel revolved base to bottel out line.

it's time to colour to the botttel that look like this

Finally bottel look like this

MAKE A SCHOOL BENCH :


HOW TO DESIGN A SCHOOL BENCH :
First i can make a bench one side of part now complect my sketch
extruded the one side of part that was look like this


Now i can use a center rectangle cammond & extruded it

Now select a center plane & use a mirror cammond

This is a mirror image

Now i will complect the bench upper design & give's a some mesuerments and extruded it 20mm only .

It's time to repeat the proses to center of the bench & extruded it 20 again only .

Finallly complect my sketch give's a some wooden colcours .

MAKE A WORKSHOP CUPBOARD :


How to make a mold using modela machine
First i will be use a inks-cape software because i can draw a 2d design in ganapathi god out line sketch .
And gives a some measurements like a drawing hite also width .
i can use a mm scale .because i want's a small mold.
like a hite-70mm and ,width-60mm .
Now i can select a parth commend and select a tresh bitmap.
now save the svg formate.
And again open the svg file a 123d design software .
now extrude the sketch how match you want a hite of the mold .
And again save this file stl formate .
Now open the computer and using ubuntu software.
First open the netfab software and edit tthe sketch again repair this sketch.
New open start the modela machine and select the x-axes & y axes because how can you start your sketch left or right. Now set the modela gravity .
Now give the sketch for stl formet .
Finally that look like this
Group assignment photos :
Looking a students How it's work
Working time of machine
My working time photos
Finally complete our 45 min sketch look like this
How to use a vinyl cutter
What is vinyl cutter ?
A vinyl cutter is a type of computer-controlled machine. Small vinyl cutters look like computer printers. The computer controls the movement of a sharp blade. This blade is used to cut out shapes and letters from sheets of thin self-adhesive plastic (vinyl).
The vinyl cutter uses a small knife to precisely cut the outline of a picture into a sheet or piece of vinyl. The knife moves side to side and turns, while the vinyl is moved beneath the knife. What results from the cut process is an image cut into the material. The material is then 'weeded' where the excess parts of the picture are removed. It is possible to remove the positive parts, which would give a negative sticker, or you could weed the negative parts, giving a positive sticker. Removing the letters would be like removing the positive, giving a negative image of the word, etc.
Now i can show how to use vinyl cutter ?
Loading your Material

- Cut off a large piece of material from the roll. This works better than feeding directly from the roll.
- Lift the rollers using the lever to the back left of the machine.
- Notice the white markings along the cutting area of the machine. Move the rollers by hand to where you will place the edges of your piece. If the blade is in the way move it to the right. Make sure the rollers coinside with the white markings so that they can catch the moving ridges.
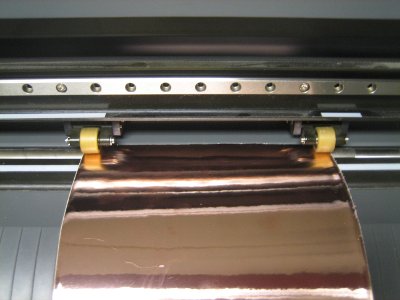
Then put your piece under the rollers and use the lever to put the rollers down, holding the piece in place.
Now there will probably be a message about sheet unloaded. Select "piece". The machine will measure the width and length of your piece.
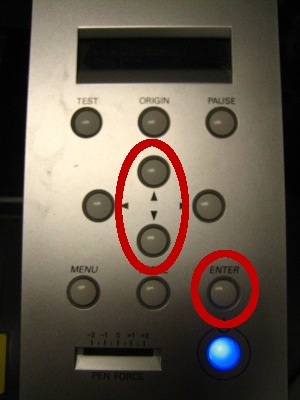
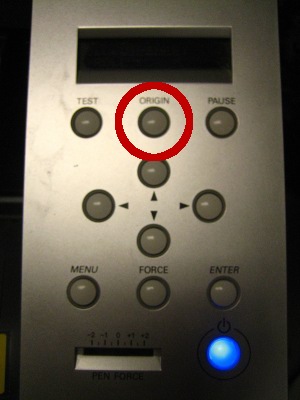
- Use the arrow keys to get to where you want your origin to be (the origin will be the bottom left corner of the cam.py window). Press and hold the origin button until the message appears in the display that origin is set.
- It might be necessary to prop up the cutter, if your copper piece is longer than 12" as it needs to remain bent (it does not flatten out completely when taken of the rool) otherwise it will crumple.
ending the File
Method One - cad.py file
Method One - cad.py file
- Open a shell and type "cad". You can make any shape in cad.py you want to cut out.
- Next, select the right output device and do 1 contour. Set the desired force and velocity.
Method Two - png file
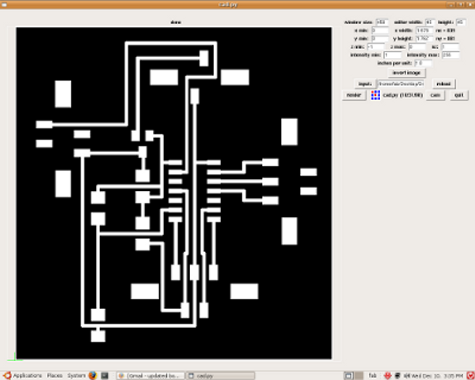
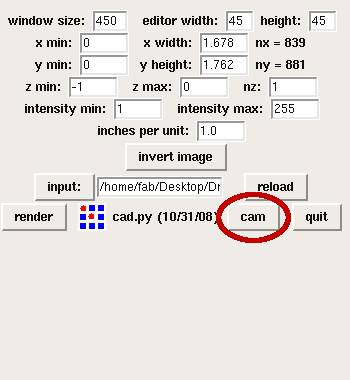
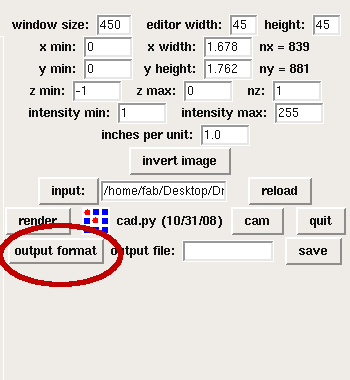

- Open cad.py - Open a shell and type "cad" or open it from the desktop icon. Your first screen will look something like this. Click the "camm" button.
Click on "output format" and select "camm" from the drop down menu.
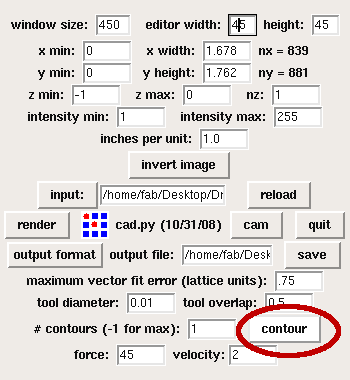
Next, click "contour". Set the desired force and velocity - most likely you will use the settings preselected by cad.py (force = 45, velocity = 2).
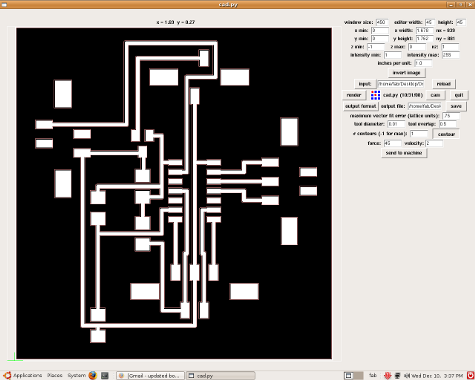
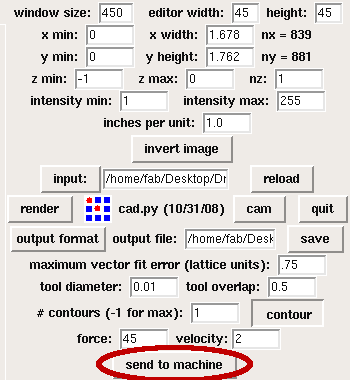
Wait a moment for cad.py to contour your png image. When it's done, you will see a "send to machine" button. Click there, and the vinyl cutter will begin on your cutting job.


0 टिप्पणी(ण्या):
टिप्पणी पोस्ट करा